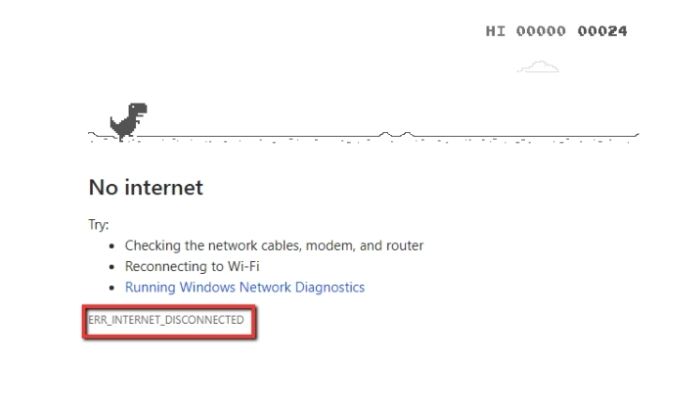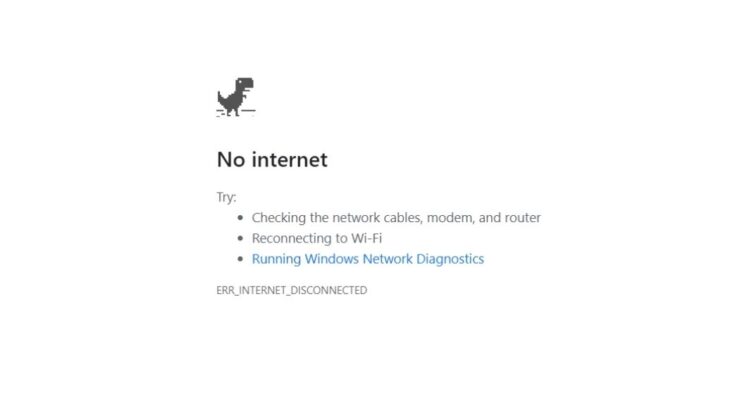
Recently, several users have been reported an issue that occurs after they upgrade to a newer version of Windows 10. To be specific, the error is “DNS_PROBE_FINISHED_NO_INTERNET”, and it occurs while trying to access the internet via Google Chrome. It’s also pretty common on Mozilla Firefox and even Internet Explorer.
The bottom line is that you won’t be able to access the internet from your computer until you fix this error; so to help you out with that, we’ve listed 2 ways you can fix this error. Now, the steps aren’t quite the same on every OS (Operating System), but for the most part, it’s the same procedure.

How to fix DNS_PROBE_FINISHED_NO_INTERNET on Windows 10?
1. Change DNS Server Settings
Try changing your DNS server settings before attempting anything else. Just follow the instructions below to change your DNS settings.
- Open up the Control Panel by typing “Control Panel” in the Windows Taskbar.
- Once you’ve opened the Control Panel, double click the network and internet option to the left of the window, and from that, select “Network and Sharing Center”.
- Again, on the left side of the window, select “Change Adapter Settings”.
- Now look for the adapter you’re using in the list of adapters that pops up, and right-click it.
- Once done, select Properties from the pop-up menu, and select the network you’re currently utilizing.
- Once you’ve selected it, locate the Internet Protocol Version 4 labelled “IPV4”.
- Double click the IPV4 to open it, and a different properties window will pop up, granting you access to the internet protocol.
- Next, select “Use the Following DNS server address”, and insert “208.67.222.222” in the Preferred DNS server, and “208.67.220.220” on the alternative DNS server.
- Once done, check the box next to “Validate Settings”, and select “OK”, and that’s it!
2. Change Router DNS Server Settings
It’s pretty much the same procedure, but instead of the internet settings, you’ll be making changes to the router settings. Just follow the steps listed below:
- Once you’ve configured your router settings, type CMD in the windows search bar to open up Command Prompt.
- After you’ve done that, type “IPConfig/All” without any quotes, and hit enter to proceed.
- Once done, you’ll need to find your network adapter in the bundle of text that pops up.
- Once you find it, look for a physical address (under it), and there should be a code similar to 64-FF-06-F1-DF-B0; copy it.
- After that, minimize the CMD window and type “NCPA.CPL” in the windows search bar, and once that opens, right-click on the network adapter you’re utilizing and select the Properties.
- Select “Configure” from the Properties menu, and click on the advanced tab located on the upper side of the window.
- After that, select “Network Address”, and click on the value feature.
- Once done, type in the address you copied from CMD, and press OK to finish the process.
- Once done, you’ll need to restart your PC, and that’s all there is to it!
3. Disable Your Firewall
If the solutions listed above don’t work for you, then you may want to try turning off your firewall. Although, that’s not what’s causing the issue in most cases, it’s still worth giving a shot.
4. Update Your Browser
If you’re still facing the “DNS_PROBE_FINISHED_NO_INTERNET” error code, then it may be because you’re using an outdated browser. Note that updates provide fixes to bugs, and improve the overall “browsing” experience of your browser, so updating your browser to the latest version is an utmost necessity. The problem should be fixed if this was the case, but if it isn’t, proceed to the next solution.
5. Flush Your DNS
If none of the methods mentioned above works for you, then there’s only one fix left, and this should work for you. Just follow the steps listed below to flush your DNS:
- Open up CMD (run it as administrator).
- Type in the following commands respectively:
- ipconfig /flushdns
- ipconfig /registerdns
- ipconfig /release
- ipconfig /renew
- NETSH Winsock reset catalogue
- NETSH int ipv4 reset reset.log
- NETSH int ipv6 reset reset.log
- Exit
Once done, it’ll flush your DNS, opening up the internet for use. If it still persists, a Restore Repair tool may be a viable option. Just download it, and hit scan to check for any problems, and click “Repair All” if it finds any.
That’s just about it! That’s all the methods you can use to fix the error “DNS_PROBE_FINISHED_NO_INTERNET”, and one of these methods should work for you. If you have any further queries or would like to add something to this article, feel free to comment down below, and we’ll try to respond to as many as we can!
READ MORE: How to Solve ERR_CACHE_MISS in Google